The introduction of the production phase of a complete stack of web application (react + node) with Docker and EC2

Implementation .. I don't know about you, but despite how many times I introduced my applications, I always keep notes somewhere sticking to remember what to do, why and when.
So, I finally decided to put together this practical step-by-step guide to the implementation of the ReaCT + Node application in the EC2 virtual machine using Docker, Docker Composation and Nginx.
Although beginner -friendly, this guide is suitable for post -production applications. We cover SSL and HTTPS setup, incomplete traffic limitation and docker composening to facilitate the use of docker.
What do we do in this guide
- Create an application react frontend
- Create an application of the Node Background Program
- Create for the front and background program for dockerf
- Create a Docker Compos File
- Start a copy of our server / EC2
- Copy project files to the server
- Set up DNS settings
- Configuration of the server
- Configure nginx
- Setup SSL and HTTPS
Prerequisites
- AWS -account with the required permits
- Node.js and NPM installed on your machine
1. Create a react frontend app
We will create our boiler plate react application. I usually use Vite because Cra started to cause problems for me after the react 19 edition.
However, the Vite server is also faster and has smaller, better optimized bundles.
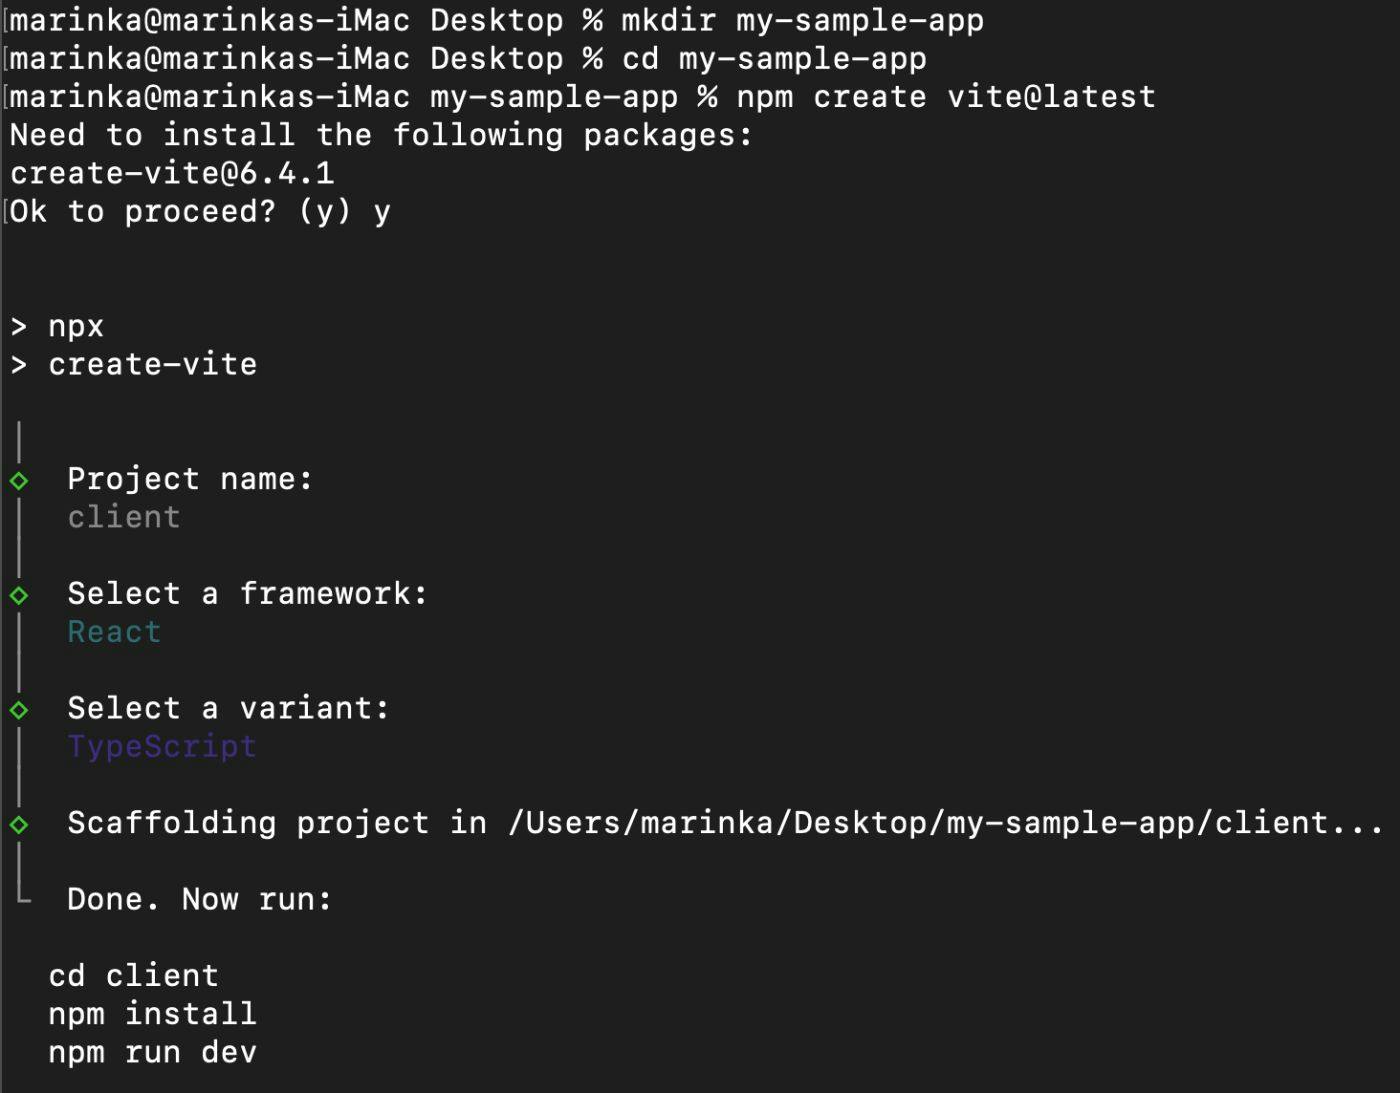
Next we will create a catalog of the root project (I called it my sample-at-style) and create an application in this directory.
If asked, submit:
- Your frontand react app name (in my case this is called client)
- Framework → react
- Variant → js or ts as you prefer


Create an application of the Node Background Program
In the root project catalog, create a catalog for your background project (I called mine background).).
Initiate the background program folder NPM and install the Express server:
npm init -y
npm i express
Create a background program folder with the main server configurations Index.JS and API End -Point (Get /API):

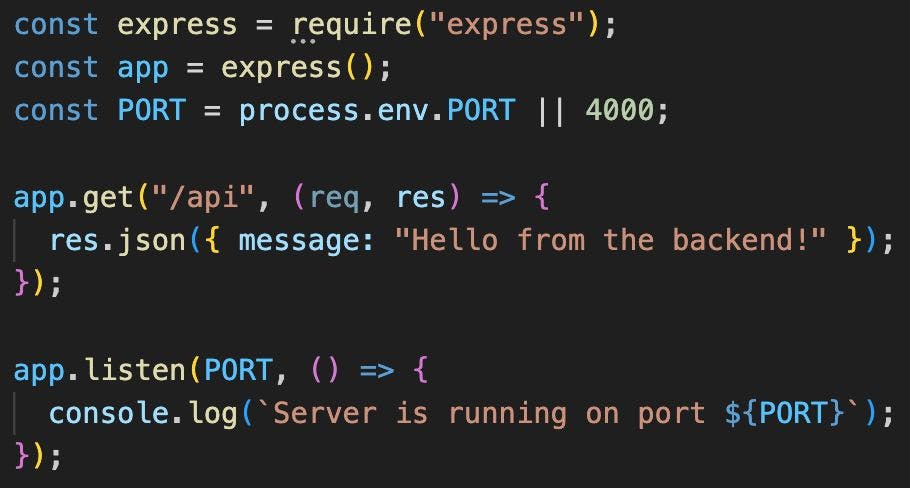
This is how your folder structure should look like at the moment:


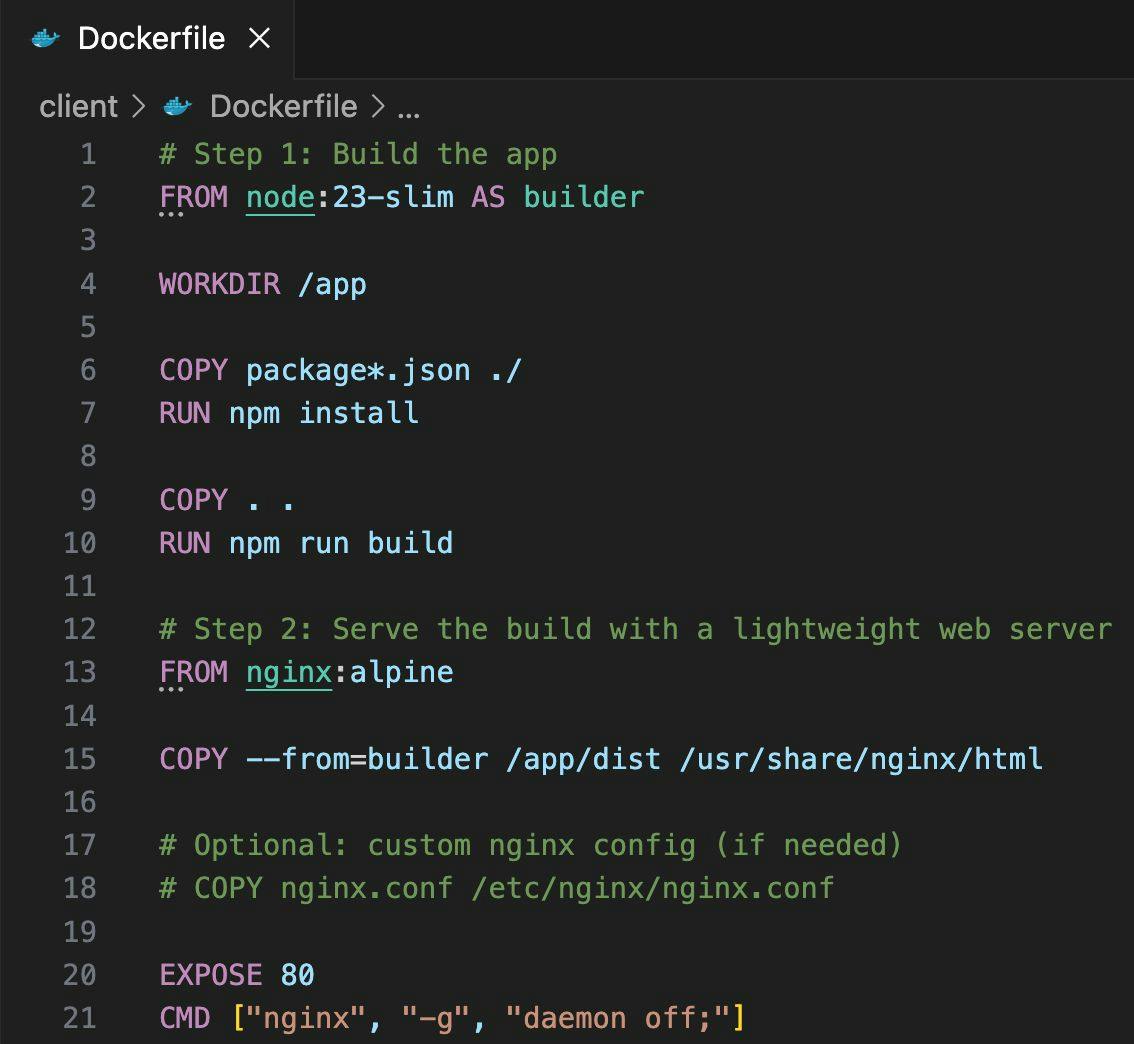
Create for the front and background program for dockerf
Inside the loyalty (where your react app is) create a Dockerf:

Also create your background folder for Dockerf:


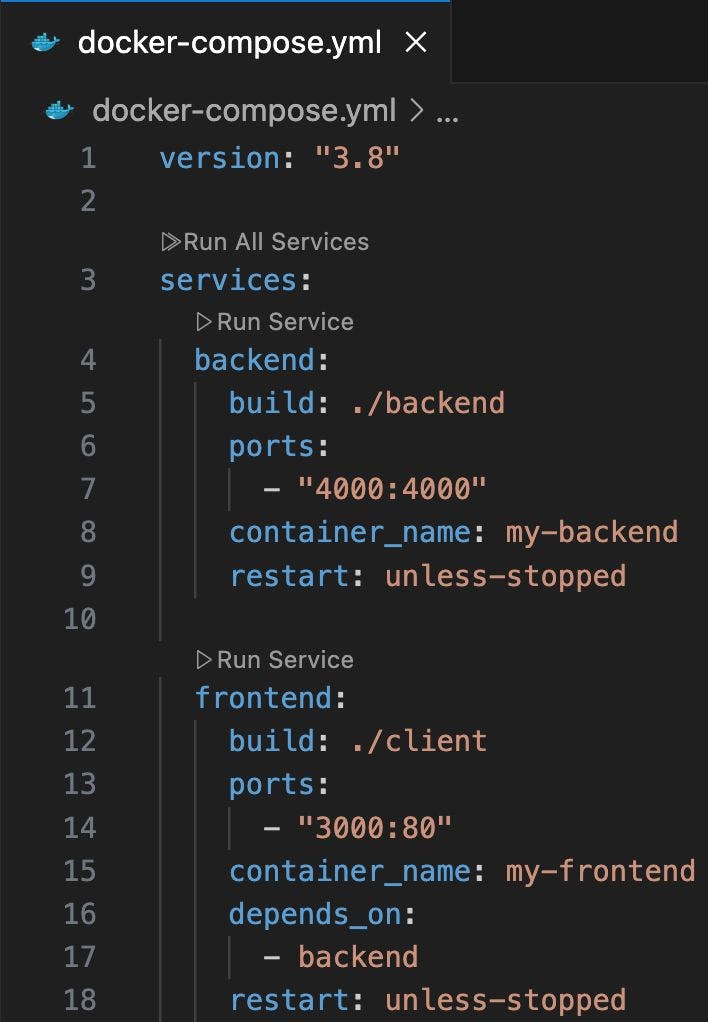
Create a Docker Compos File
In the Root project catalog, create a file docker-compose.yml:

Start a copy of the server / EC2
Now is the time to create our server, IE, start an EC2 copy.
Log in to AWS console → Search EC2 search bar → go to the EC2 console:

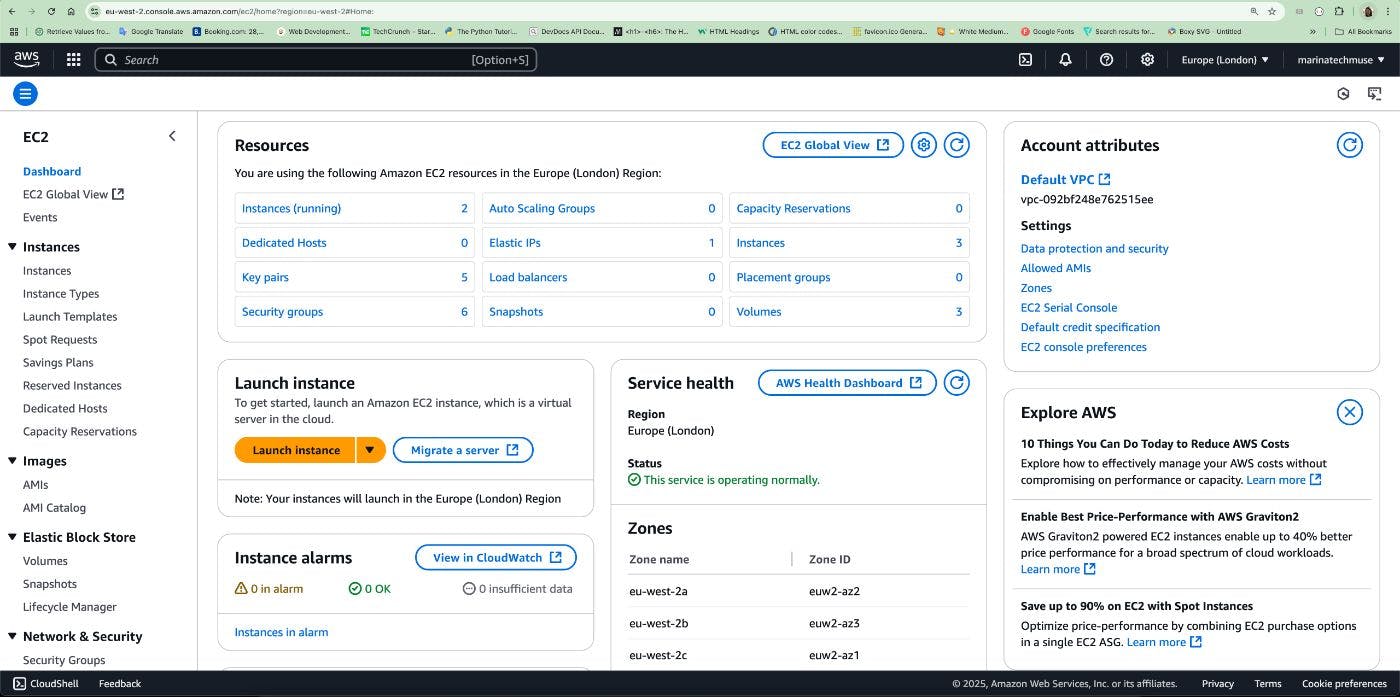
Click “Sitting Copper” button.


If you don't have a .pem key yet, create it here. Click “Create a new key pair”:


Submit the name of your key pair, select RSA key pair type, .PEM format and click “Create a key pair”:


Choose the following options in the network settings section (this can be customized for more accurate access):


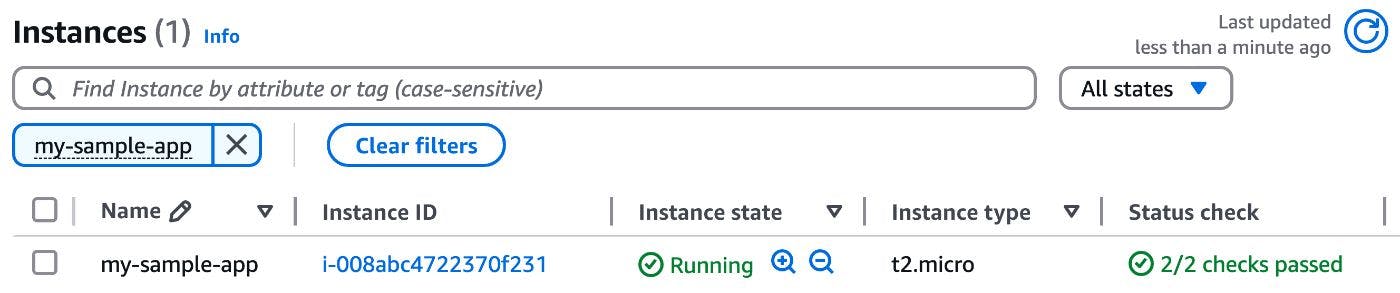
Leave the rest of the default and finally click the button “Sitting Copper” And wait a few minutes for the copy to be at work and all the checks are transmitted in the status control columns:

Copy project files to the server
Now that we have created our server, we will connect the SSH and .PEM key pairs.
First, note the public IP of the server. Click the EC2 Copy ID and copy its public IPV4 address:


Open the terminal on your local machine, go to the catalog where your .PEM file is saved, and connect to the server as shown in Picture 15. “Yes” When asked:


If you have a failure related to your key with too open rights, you need to start the CHMOD command to restrict the key chmod 400
Now that you have secured a SSH connection with a successful server, exit the server by writing “Exit”To.
Now we need to copy our project files to the server.
You can do this in many ways. You would usually create a SSH connection between EC2 and your code recording (ie Bitbucket, Github, Azure Devops, etc.).
In our case, we simply copy the project directly from our local machine to the server and we have a well -established SSH connection for it so your terminal works:
scp -i -r ec2-user@:~/
Replace your key, project and your EC2 copy public IP as needed.
For example:
scp -i my-sample-app-key-pair.pem -r /Users/marinka/Desktop/my-sample-app [email protected]:~/
The above command will copy your project to the server.
Now SSH is back to your server (Reference Photo 15) and check that your project files are now available on the server ls
Set up DNS settings
You must log in to your DNS provider to make your app available to make your app or in our case.
For the sake of this article, I will post to my sample application site SampleApp.catbytes.io.
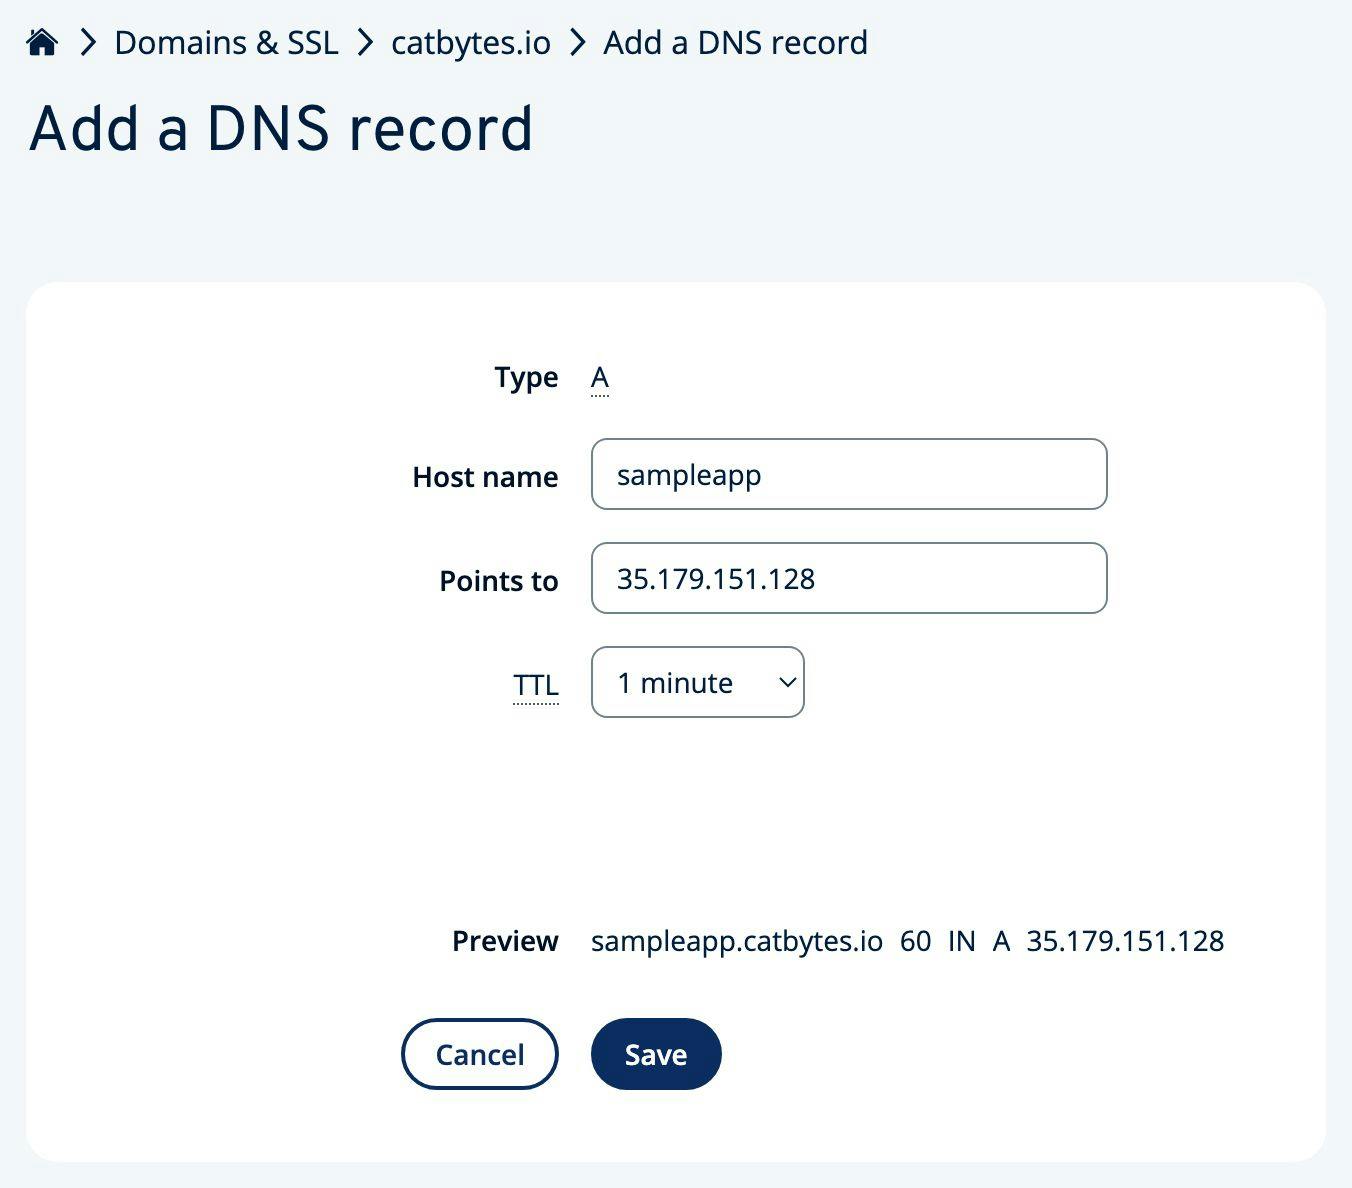
Log in to your DNS provider (in my case Ionos) and find where you can Add a new DNS recordTo.
If you want to implement a subdomain, add a new ”Record ” With the following values:
-
Hostname: The name of your preferred subdomain, the part that comes before the domain itself
-
Indicates: Your EC2 copy public IP
-
TTL: Time to live, ie the time that specifies how long the DNS record can be saved in the cache before it needs to be updated and display

After adding a new DNS entry, it will take some time to distribute.
You can use a website like dnschecker.org to check the status of spread.
After complete distribution, your sub -domain/domain should point your EC2 copy to a public IP:


If you want to implement a domain rather than a subdomain, you must offer @ as a value of the hostname
Configuration of the server
Since we use Amazon Linux 2023, we will continue with it dnf to install the necessary packages.
Connect to your server using SSH (Figure 15).
Update the packages
sudo dnf update -y
Install Docker
sudo dnf install docker -y
Start and promise docker
sudo systemctl start docker
sudo systemctl enable docker
Add your user to the docker group
sudo usermod -aG docker ec2-user
After this stage, exit the server and connect it back to implementing its configurations
Download Docker Compos Binary:
`sudo curl -L " -s)-$(uname -m)" -o /usr/local/bin/docker-compose`
Start the command below to be triggered:
sudo chmod +x /usr/local/bin/docker-compose
Start the command below to check the installation of Docker Compne:
docker-compose version
Drink your project
docker-compose up --build
Result
Now you should have both front and back tanks:


Configure nginx
Now we are installing nginx.
Nginx is an open source software used as a web server, upside -down proxy, charging balancer and more.
We use it to serve our static construction files from the react front and also act as a reverse proxy server that transmits API applications to our node background program. This allows us to reveal the end of one of the secure HTTPS for one application, while keeping our internal services hidden and modular.
Install nginx:
sudo dnf install nginx -y
Start and promise nginx:
sudo systemctl start nginx
sudo systemctl enable nginx
Update the NGINX configuration file
First, open the main NGINX configuration file:
sudo nano /etc/nginx/nginx.conf
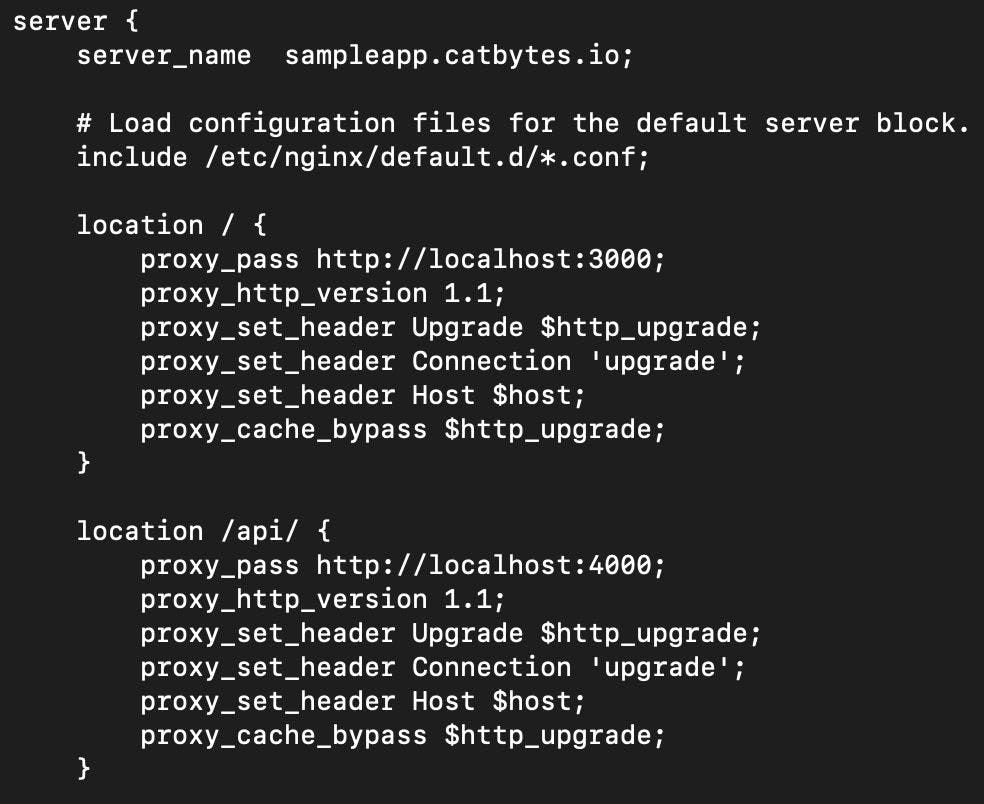
You will then need to update the NGINX.CONF section to add the following:
- Server Name (Your Subdemen Name)
- Proxy Configurations for Frontand (in our case have been introduced http: // localhost: 3000)
- Proxy Configurations for the background program (in our case have been introduced http: // localhost: 4000)
See example below:

Press to save the changes in NGINX.Conf -Press Control + X and Y
You can check the nginx.conf syntax sudo nginx -t
After saving configuration changes, re -reload again by restarting sudo systemctl reload nginx
Set up ssl and https
Finally, we set SSL certificates and https.
Install CERTBOT + NGINX plugin
sudo dnf install -y certbot python3-certbot-nginx
Issue your domain/subdomen's SSL certificate
sudo certbot --nginx -d
For example, e in our case:
sudo certbot --nginx -d sampleapp.catbytes.io
The implementation is complete!
Ta-daa!
Congratulations, you have successfully introduced your application!
Now you should see your RACT app available Domain/subdomain and API available at your Domain/subdomain/APIFor example:
- React is available at
- Node available at /API
Security
Depending on your application and requirements, you might want to consider some of the best security practice to make your application and/or API stiffer and safer.
Think about the tips below:
- Restrict SSH access As you need, you can now get SSH (0.0.0.0/0). For example, you could only limit it to your local machine IP or company VPN. Set this AWS EC2 Console → Your EC2 Copy → Security Group → Incoming Rules
- To automatically update the SSL certificates, set the CRON task on your server. This is important because if they expire (and they expire in 90 days) your application is down. You can use ceria for that
- Try not to use a root user at Dockerfil; Better Create a non -Jewel user to trigger commands
- Consider the hardening of the NGINX configurations to limit the possibility of dos attacks, eg add headers of the basic speed limiting and security
Conclusion
In this guide we discussed the following:
- The basics of Docker
- AWS EC2 setup and traffic security rules
- NGINX upside -down proxy setting
- HTTPS certificates with Certbot
- Implementing a full sample
I hope you liked it and it was easy to watch it.
If you have any problems please contact.
I would also like to hear what you are building and implementing 🚀